Pins
By Shannon and Jason
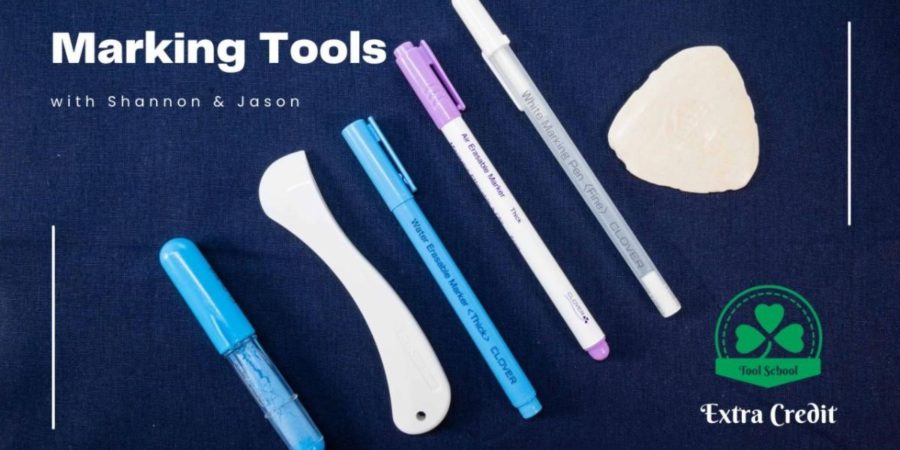
A quick glance at Clover’s website will show a plethora of items made just for marking fabric and projects…literally dozens. GAH! Where to start? We understand how confusing it can be. We keep a healthy variety of these marking tools at our cutting table, sewing machines, and workspace… just in case… which means we have a lot of marking tools. So, with all the options available to us, which tools do we reach for first when we are working in our studio? Glad you asked! The answer is… it depends.
Yeah, we know… that’s a bit of let down right? Like an assembly of superheroes each tool has its strengths and occasional weakness and knowing what they are will help you decide which to use on your projects. To make it a little easier for you, we put together a video starring the marking tools we use most often showing why we use them. Try them out for yourself and decide which ones work best for your projects. Then, run, don’t walk… order more of your favorites. The first time you can’t find your white marking pen or Hera marker or, horror of all horrors, that last little sliver of tailor’s chalk finally gives out and you don’t have a fresh one ready to go, you’ll wish you had spares and backups for your spares.
As a demonstration of one way we mark fabric, we have included our tutorial for an easy sashiko style visible mending patch for your jeans. If you are anything like Jason, you probably have at least one pair of 501’s that have a hole or two (or six) in the knees (He’s being modest… he can put holes in the strangest places in his jeans. ~ Shannon). Jeans were destined for… scratch that… they were actually IN the scrap bin waiting to be cut up. Well, let’s pull those jeans out of the bin, mark up a grid, stitch a few lines, and make them trendy once again.

NOTIONS AND TOOLS
- Tailor Chalk (item#432)
- Black Gold Applique/Sharp Needles (Art. No. 4670-73)
- Basting Thread – Aurifil 50wt cotton thread,
- Glue – Elmer’s Glue Stick
- Fabric Marker – Air Erasable Marker Purple (Thick) (Art. No. 5031)
- Desk Needle Threader (Art. No. 4072)
- Long Type Sashiko Needles (Art. No. 2009)
- Adjustable Ring Thimble with Plate (Art. No. 611)
- 12 weight Aurifil thread, Shibaguyz Fab Sashiko Essentials Thread Collection
- Patchwork Scissors (Art. No. 493/L)
MATERIALS:
NOTE: For this project, we patch a pair of jeans,
but this same technique works on any worn or torn fabric.
- Torn Jeans
- Fabric
- Any fabric scrap that is 2-3” larger than the hole being patched
INSTRUCTIONS
Visible Mending: Sashiko Jeans Patch
Choose Your Patching Fabric
Select fabric that will peek out of the hole once your stitching is complete. This is totally up to you and your taste. Play with different colors, patterns and textures.
Cut the Patch
Turn the jeans inside out and lay your fabric on top of the hole.
Cut the fabric patch so it is at least 2-3” larger than the hole.
Check the placement on the front so that you like any patterns that peek out.
Glue and Baste the Patch
Using a fabric-friendly glue stick like Elmer’s School Glue Stick, glue around the hole on the wrong side of the jeans. This will hold the patch in place as we baste and sashiko the patch in place.
Using a Clover Black Gold #9 Applique/Sharp needle and regular sewing thread, baste the edges of the patch to the jeans being careful to not sew through the entire leg… just the one side please. (Why do we tell you things like this that seem obvious? Because we might have done it ourselves… just sayin’…)
Remove Excess Thread
Turn the jeans right side out and remove any excess threads or fraying around the hole. It is up to you how much to remove but remember, a little fraying looks good on a patch like this. The edges will continue to fray over time with washing and wear.

Make a Grid:
Make a grid that is at least 1/4” between lines. You can use a quilting ruler, but we prefer to use plastic canvas grid to keep all of our lines nice and neat.
TIP: We love using plastic grid from craft and
art supply stores for making grids.
- Lay the plastic grid on your jeans overlapping the hole at least 3” on all sides.
- Pin the plastic grid into place.
- Use a fabric marking pen to poke into each hole of the plastic grid, making a dot on the fabric.
- TADAAAA perfect grids in no time!

Sashiko Stitch the Patch in Place
Put on your Adjustable Ring Thimble with Plate and thread up a Long Type Sashiko Needle with heavy weight thread (we recommend using Aurifil 12 weight thread), remember to double your thread by getting a long length of thread and fold it in half, then thread the fold through the eye.
NOTE: For an introduction to sashiko,
check out our video on our blog HERE
We have included a handy diagram of how to stitch Offset Crosses here for you to use.
- Stitch all of the Vertical rows first.
- Remember to look at the previous rows and offset the stitches of the following row. i.e. stitch where there is a space on the previous row and leave a space where there was a stitch on the previous row.
- Stitch all of the Horizontal rows
- These are easy since all you are doing is crossing the vertical stitches!
As you stitch, remember to stitch through both the denim and the patch fabric below. You’ll turn the jeans 180º with each row you stitch.
Finishing
When your stitches are all crossed, remove the basting thread then wash and dry your jeans to remove the dots.
Now, put on your now FAB jeans that you saved from the scrap bag and wear them with pride. Maybe think about “accidentally” tearing them in another spot so you can make them look even better… you’re on a slippery slope.
Enjoy it!
S&J
