Loop Pressing Bars
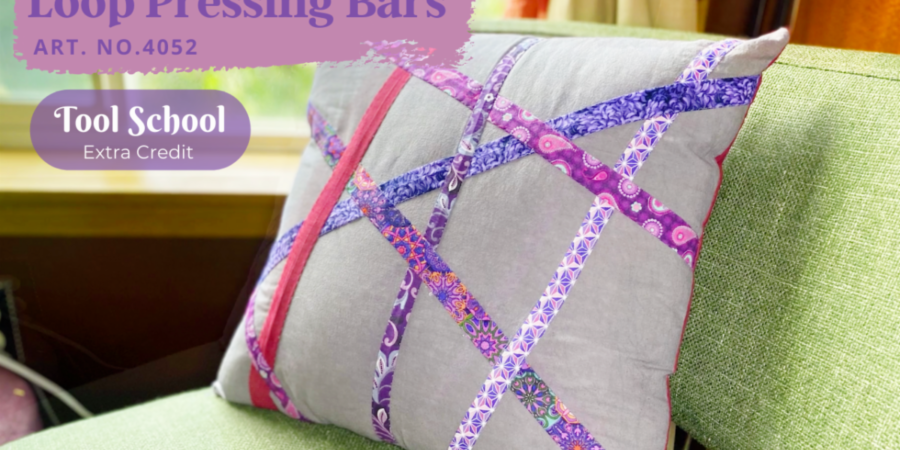
Pick Up Sticks Pillow
By the Shibaguyz
Pick Up Sticks Pillow
Small strips of fabric can make a big impact on your home décor. With just a few pieces of fabric, and Clover’s Loop Pressing Bars you’ll be well on your way making modern art inspired pillows for your sofas, chairs, or wherever you need a pop of vibrant color. These Loop Pressing Bars are not just for bias cut fabric either… we cut our strips with the grain of the fabric for a clean straight finish. But, if you desire a little curve in your final result, by all means cut bias strips and curve away. This truly is a make-in-an-afternoon project so don’t be afraid to experiment! No matter how you decide to arrange your strips, you’re going to love the final result.

MATERIALS
Pillow Fabric:
2 Fat Quarters for the top and back of the pillow or 18” of your favorite fabric in your two favorite colors. We used Cherry wood Hand Dyed Fabric in Red and Gray.
Strip Fabric
Random fabric at least 3” wide by at least 24” long. This is a great project for using up scraps! More information about measurements to follow.
1–18” Pillow insert or stuffing
Thread:
Sewing machine thread to match fabric
We used Aurifil 50 wt thread for machine sewing but it is also perfect for hand sewing if you decide to go that route.
TOOLS:
Clover Loop Pressing Bars – Item 4052
Clover Wonder Pins and/or Wonder Clips Item – Item # 3183
Clover Rotary cutter – Item # 7500
Sewing machine or hand sewing needles – Our machine is the BERNINA 790 PLUS
FINISHED DIMENSIONS:
17×17″
CUTS:
1–18″ Pillow Front fabric
1–18″ Pillow Back fabric
3–1 5/8″ x 24″ Strips (for the 12mm Loop Pressing Bar) – “thin strips”
4–2 1/4″ Strips (for the 18mm Loop Pressing Bar) – “wide strips”
Note: You can use as many or few strips as you like.
INSTRUCTIONS
1. Make your cuts
- Cut your front and back fabric to match your pillow form size. We used an 18” pillow form so our front and back are 18” square.
- Cut the strips to be turned into tubes. We have provided the size if you are using the 12mm or 18mm pressing bars.
i. For the other sizes you will need 2x the width of the bar, plus 1/2” seam allowance (1/4 for each side) PLUS 1/8 inch for some wiggle room.
2. Make your Strips
- With Right Side out, fold the cut strips in half lengthwise and press.
- Using a 1/4-inch seam allowance, sew down the long side with cut edges together, making a tube.
i. If the seam allowance is more than 1/2 the finished width of the tube, trim the seam to 1/8″ after sewing.
- Insert the pressing bar into the fabric tube and turn the tube so the seam in on the flat side of the bar.
- Press the seam to the side or press open.
- Repeat for all tubes.
i. Special Note: If you want your “Pick Up Sticks” to stand out from the fabric use the Loop Pressing Bar to pull through a thin strip of batting, length of thick yarn, or similar upholstery piping.


3) Assemble Your Pieces
- Lay the pillow top Right side up.
- Lay your strips on the pillow top arranging as you like.
i. Make sure to overlap the edges at least 1/2″ to secure the strips when sewn down.
4) Applique the Strips to Pillow Top
- Using an applique stitch on your machine and an Edge Stitch Foot if you have one, sew down the side of each strip. You will need to start and stop where the strip you are working on goes under another strip. If the strip crosses on top continue to sew over that area.
Sew all the strips to the pillow top.

5) Sew Pillow Together
- Lay the finished top Right side up.
- Lay the pillow backing Right side down on top
- Pin or Wonder Clip along 3 sides
- Along the 4th side, pin or clip up to 3″ from the edge leaving an opening large enough to insert the pillow insert later.
- Sew along the pinned line 1/2” from the edge with a strong stitch.
6) Turn Pillow Right side out.
- Marvel at your new creation…
- Turn under the opening area 1/2” on each side and press.
7) Last Steps
- Insert the pillow form and adjust.
- Hand sew the opening closed using a ladder stitch.
8) TAADAA!!
