Loop Pressing Bars
with instructor Steve Butler
Class 141
What is it? – Why do we willingly expend so much effort when we sew? Quilting, fashion, home decor and all of the accessories relating to each? Hours spent selecting just the right pattern (no easy task), the right fabric (no easy task) and the right threads (yes, no easy task here either). It’s because at the end of the day we want it to be ours, an expression of our own personal creative vision. And as if the selection of patterns, fabrics and threads isn’t enough, there’s one more creative element to consider. How about the accents? You know, those things that add the personality to our project. Those little tweaks that provide either color or form or function or all three. Some of the most useful accent forms center around the application of fabric tubes. Cut on the bias and pressed flat, these tubes can take any shape we want to impose. Flower stems, Stained Glass or Celtic designs appliquéd on quilts. Bindings for quilts, fashion or home décor items. Straps for fashion and lingerie. Button loops for bags and dress making and any number of fashion accessories. The list is endless. What a great creative tool. But how hard is it to make these bias tube strips? You know, to really make them perfect. Consistent in shape and width. To help us achieve this level of creative potential with perfection, Clover has produced a set of Loop Pressing Bars. With these little gems we can produce bias fabric tubes to fit even the most demanding creative applications.


What does it do? – Simply put Clover’s Loop Pressing Bars allow us to create more than professional looking bias fabric tubes using any fabric we desire and we can do it in sizes appropriate to our creative vision. Here’s how.
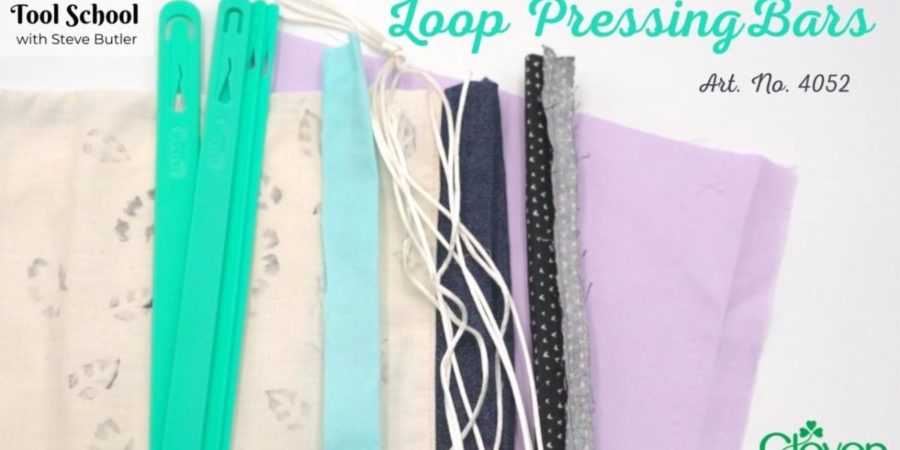
Process – Clover’s Loop Pressing Bars are provided in a set of five sizes, 6mm (1/4″), 9mm (5/16″), 12mm (1/2″), 15mm (9/16″), 18mm (11/16). Select the size fabric loop desired and then cut your fabric on the bias in a size twice the width of the Pressing Bar plus two 1/4″ seam allowances. For example, if we wanted a 1/2″ fabric tube we’d cut our fabric 1″ plus 1/2″ for the two seam allowances. We can then proceed to our sewing machine and, with the wrong sides together (I know, it’s weird and counter intuitive) sew our 1/4″ seam allowance. Now we simply insert our Loop Pressing Bar into the tube, trim the seam allowance and manipulate the seam to the center of the bar and iron the tube smooth. This can be done on the bar or, if we have a particularly long tube, on a separate pressing surface as we pull it off the bar. In the process the pressing bars may become warm but will not be too hot to touch. Now we’ve produced the perfect fabric bias tube for our project. All that’s left to do is attach it to your project and prepare yourself to accept compliments for your amazing artistry.
Tool School Tip #1 – It’s important that our 1/4″ seam allowance be perfectly straight. To ensure this, use Clover’s 6-in-1 Stick and Stitch seam guide on the needle plate of your sewing machine. We can either set it 1/4″ over and sew the seam measured from the edges of our fabric or we can set the seam guide at the desired width of our bar/tube width and sew with the fold against the 6-in-1 seam guide. Either way, we’re getting a perfectly smooth and even seam that will ensure a perfect bias tape width along its entire length.
Tool School Tip #2 – All of these bias fabric tube seam allowances require close work to press with precision. Clover’s Mini Iron II is the perfect tool to achieve this. It is extremely easy to manipulate and has a very precise point that makes it easy to press those seam allowances perfectly flat. Tool School Tip #3 – The end of each Loop Pressing Bar is designed with a feature that allows you to use it much like an enlarged bodkin. If you’re looking for a more “filled” or trapunto decorative appearance to your appliqué, simply attach your cording/stuffing material to that end and pull through.

How do I share it? – When most people see complicated projects using bias strips (think Celtic quilt appliqué) they quite naturally assume it is not only difficult but perhaps it is too difficult. It isn’t. A few classes implementing appliqué for stems or Celtic designs and using Clover’s Loop Pressing Bars will convince them otherwise. An amazing sample or two in the shop will bring them in. Set up a demo board in your shop so everyone can see how it’s done. Understanding the concept imbues confidence. Attractive bias strips are the icing on the cake. It’s the accent that adds the pop to all of our projects.