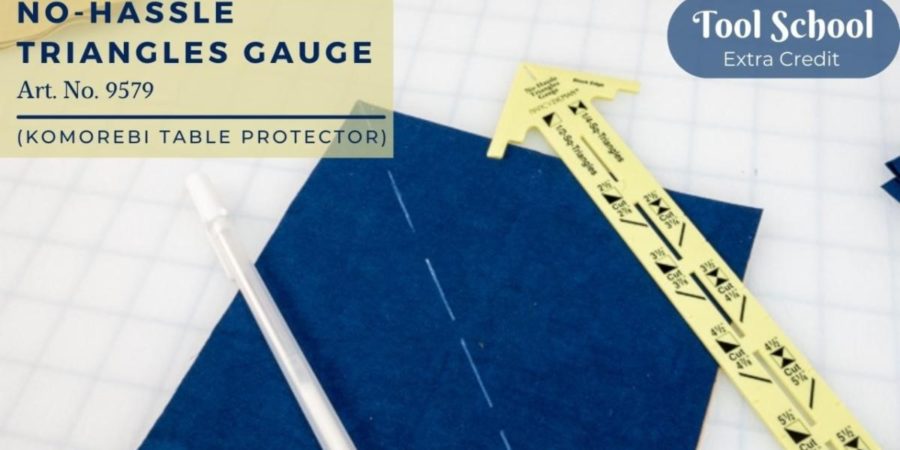
No-Hassle Triangle Gauge
Komorebi Table Protector
By the Shibaguyz
Komorebi: Translation – Japanese: Sunlight filtering through the leaves of a tree.
Sitting outside during summer on our patio is a special pleasure that we never take for granted. One of the things we love most about it is that, as the sun starts its descent into night, we get the most beautiful scattering of light and shade through the trees of the backyard. The Japanese have a word for this—Komorebi, which although technically untranslatable into English, is roughly thought of as sunlight filtering through the leaves of trees.
When we started putting this project together, we were drawn back to this idea, and a photo we took of the shadow of leaves coming through the patio umbrella as we sat out back one summer evening. Without much difficulty we could see the light and dark triangular shapes which in turn lead us to using Clover’s No-Hassle Triangle Gauge to construct our table protector.
We wanted our Table Protector to have a modern art flair so, using two coordinating colors of Cherry wood Hand Dyed Fabric and a photo of tree branches and leaves peering through our patio umbrella, we started playing. The resulting project has become one of our favorite home décor items!
Making your own Table Protector into an art piece couldn’t be easier with the Clover No-Hassle Triangles Gauge. The gauge makes it easy to take basic squares and turn them into triangles that can be assembled into any shape your brain can come up with. For those of you into improv quilting this is the perfect project to use up scrap fabric for a more eclectic feel. You can follow our assembly diagram to duplicate our interpretation of the Komorebi as we observed it in our garden or play with your own design. No matter how you decide to arrange your triangles, you’re going to love the final result.

MATERIALS
Blocks Fabric:
1/2 yard each of your favorite fabric in your two favorite colors. We used two Cherrywood Hand Dyed Fabric in Royal Blue and Sheepskin.
Backing Fabric
1 yard fabric, your choice. We chose to use the same Royal Blue as the top.
Note: We didn’t use any lining fabric or batting for our Table Protector, but you could easily add a middle layer of muslin or scrap fabric or a layer of thin batting.
Thread:
Sewing machine thread to match fabric
TOOLS
Clover No Hassel Triangle Gauge – Item # 9579
Clover Wonder Pins and/or Wonder Clips Item – Item # 3183
Clover Rotary cutter – Item # 7500
Sewing machine or hand sewing needles
Aurifil 50 wt thread for machine or hand sewing
FINISHED DIMENSIONS:
30″ x 10″
This pattern uses all half triangle squares, a total of:
2–6 1/2″
8–4 1/2″
10–2 1/2″
CUTS:
1–6 7/8″ blue square
1–6 7/8″ tan square
4–4 7/8″ blue squares
4–4 7/8″ tan squares
5–2 7/8″ blue squares
5–2 7/8″ tan squares
6–10 1/2″ x 1 1/2″ Vertical strips matching one color of your squares
2–30″ x 1 1/2″ Facing strips matching the above strips
Backing Fabric:
30.5″ x 12.5″
INSTRUCTIONS
1) Make your cuts
- Cut your fabric squares following the instructions on the No Hassel Triangles Gauge.
- Cut your strips and backing fabric

2. Follow the directions included with the No-Hassle Triangles Gauge for making half triangle squares.
- Lay one square, color 1, on another, color 2, U
- Use the tool to draw a line down the center
- Sew a 1/4″ seam parallel to the center line drawn on each side of the center line.
- TIP: We like to use Clover’s White Marking Pen to draw in the 1/4″ line for easy sewing.
- Use a rotary cutter to cut down the center line, making 2 half triangle squares.
- Iron the squares pressing the seams to the side of the darker fabric.
- Cut off your dog ears.


3. Assemble Your Pieces
- Follow the included schematic or change the layout to suit your personal style.


4. Sew Top Together
- We find it easy to sew smaller squares together first, then working in sections sew larger squares on building in a strip.
- Press all seams after sewing.
- Once the strips of squares are assembled sew in your vertical strips
- Sew on the facing strips along the long edges.

5. Sew On Backing
- Lay finished top and backing fabric together Right Sides facing. Hold together with Wonder Clips.
- Sew 1/4″ all the way around, leaving a 3″ opening on one side for turning.
- Trim as needed
- Trim corners close to, but not cutting through, the sewn line

6. Turn Right Side out.
7. Finger press the remaining opening and hand stitch closed.
8. Give everything one last pressing.

Final Step: Place on your patio table and show off your FAB piece of art.
