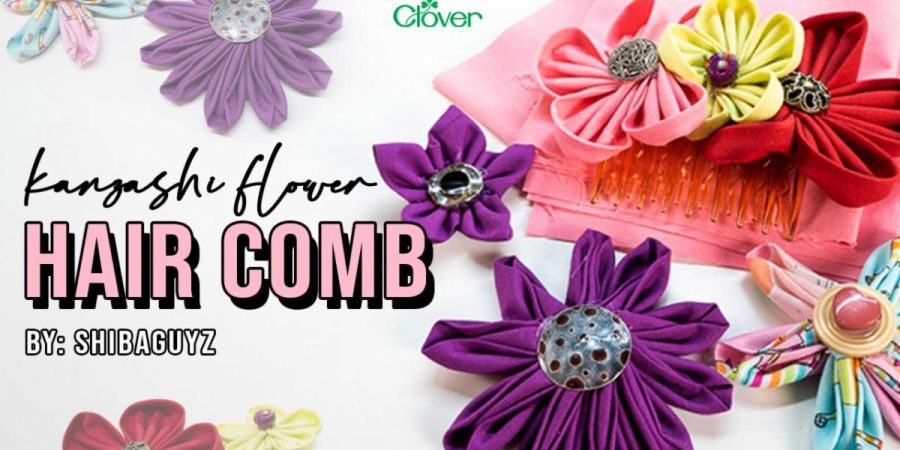
Kanzashi Flower Hair Comb
By the Shibaguyz

Kanzashi flowers have been used for centuries in Japanese culture as ornamentation for hair combs and picks. Originally, makers of Kanzashi would train for years to learn the intricate art of folding and sewing fabric into floret shapes, but thanks to the fab folks at Clover, you can make your own Kanzashi Hair Comb using their templates that make quick work of these intricate shapes.
In only a few minutes with a minimum of effort you can have a beautiful accessory for your hair or home décor. Plus, they are a lot of fun to make! Let’s get to it and make some Kanzashi flowers!

NOTIONS AND TOOLS
- Kanzashi Flower Maker – Art. No 8483-8487
- Scissors – view Clover’s assortment!
- Rotary Cutter – Art. No 7500
- Black Gold Hand Sewing Needles- Art. No. 4970-73
- Sewing Thread (We recommend using Aurifil 12 wt cotton thread)
- 1 plastic/metal Hair Comb, Hair Clip or Barrette
- Hot Glue
- Assorted Buttons or Large Beads
MATERIALS
Fabric
Each Kanzashi Flower is made from 5-10 petals, or as many as you like. Fabric amounts will vary based on the size and number of flowers made, but 2-3 fat quarters should make a nice assortment of flowers in different arrangements and sizes.
We used a variety quilting cottons for our flowers, but you might find that rayon or bamboo batik fabrics also have stunning results. Try using both patterned and solid fabrics for your flowers. Each flower type and size will look different with unique fabric.
INSTRUCTIONS
Step 1: Cuts
- Cut your fabric squares to the dimensions on the instruction sheet included with your Kanzashi Flower Maker.
 Step 2: Insert Fabric in the Kanzashi Flower Maker Tool
- Fold the fabric square as instructed on the instruction sheet.
- Some petals are made folding the fabric on the bias, others are made folding with the grain.
- Place the folded fabric in the Kanzashi Flower Maker and snap it closed.
Trim the excess fabric, leaving about 1/8” hanging outside the Flower Maker.

Step 3: Sew
- Thread a long length of sewing thread through a sewing needle and tie a knot in the end.
- We recommend a heavier weight of sewing thread to make tying the ends off easier. We used our Aurifl 12 wt cotton thread in a coordinating color.
- Using a thread conditioner on the string helps to keep tangles away as you sew.
- Start by bringing your needle up from the back by the #1 spot where you see “Start” printed on the tool.
- Continue to sew up and down through the holes following the numbers ending in the hole indicated by “End.”
- Your thread should nestle in the grooves between each hole.

Step 4: Finish the Petal and Start the Next
- Open the Kanzashi Flower Maker and remove the fabric.
- Pull the thread to fold the fabric into the petal shape.
- IMPORTANT: Do not cut the thread!
- Repeat Steps 2-4 until you have the desired number of petals sewn together.

Step 5: Tie Off
- Pulling the knot from the first petal, pull out an extra bit of thread to use for tying a knot at the end.
- Fluff and shape the petals as needed to ensure they look like… well… flower petals!
- Pull both ends of the string together and tie off in a secure knot.
- Do one more fluff and shape on the petals.
Step 6: Add a Button or Bead
- Hot glue a button or large bead to the center of your flower to cover the hole.
- We like stacking different buttons together or adding lace to the center then putting a button on top of that.
- Try stacking smaller flowers on a larger one for an even more complex flower design.

Step 7: Continue Making Flowers
- Make flowers of different sizes and shapes until you are ready to add them to your comb.

Step 8: Put your Hair Comb together
- Play with various arrangements of flowers… color, size, pattern, texture.
- Hot glue your flowers to the back of a plastic hair comb, or metal hair clip
DONE!